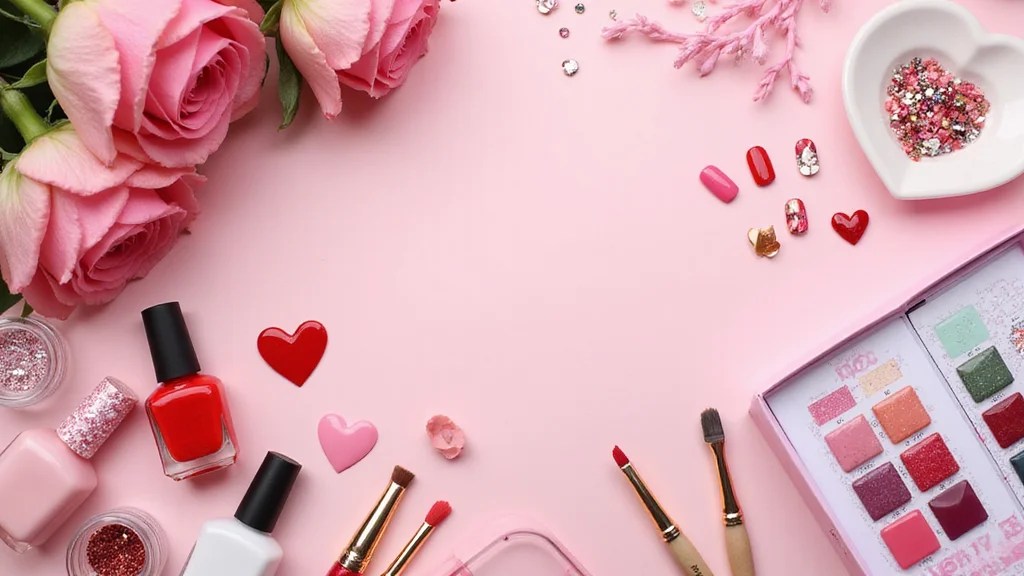
Looking for a way to express your personality and creativity? Nail art has become a fantastic outlet for self-expression. Bright nail designs can turn your hands into a canvas of color and style. After all, who doesn’t want their nails to steal the show? In a world where first impressions matter, your hands can command attention with just the right pop of color. I created this post to share some of the most spectacular colorful nail designs that will leave everyone in awe.
If you’re someone who loves to make a statement with your nails or you’re just starting your nail art journey, this blog is for you. Whether you’re prepping for a special event, looking for a fun weekend project, or simply want to add a splash of color to your everyday look, these designs will inspire you. You’ll find a variety of bright nail designs that are vibrant, eye-catching, and sure to spark your creativity.
Get ready to explore 20 fabulous nail designs, each more unique than the last! From playful polka dots to dazzling gradients, there’s something here for everyone. So grab your favorite nail supplies and let’s dive into the world of colorful nail art that’ll make your hands the center of attention!
Key Takeaways
– Discover 20 stunning nail designs that can brighten up your look and express your personal style.
– Each design is versatile, suitable for different occasions like parties, holidays, or casual outings.
– Find step-by-step ideas that range from simple to intricate, perfect for beginners and seasoned nail artists alike.
– Learn about key materials and techniques to achieve these vibrant and eye-catching styles at home.
– Unleash your creativity and have fun experimenting with colors, patterns, and textures that reflect your personality.
Contents
- 1. Rainbow Swirl Delight
- 2. Neon Floral Burst
- 3. Geometric Funk
- 4. Tropical Vibes
- 5. Cosmic Galaxy
- 6. Candy Coated Dreams
- 7. Ombre Elegance
- 8. Watercolor Whimsy
- 9. Color Block Brilliance
- 10. Glitter Galaxy
- 11. Metallic Glow
- 12. Bright Zebra Stripes
- 13. Dazzling Gradient Rhinestones
- 14. Fun Polka Dots
- 15. Shimmering Lace
- 16. Colorful Stars
- 17. Bright Marble Effect
- 18. Funky Animal Prints
- 19. Whimsical Butterflies
- 20. Bright Confetti
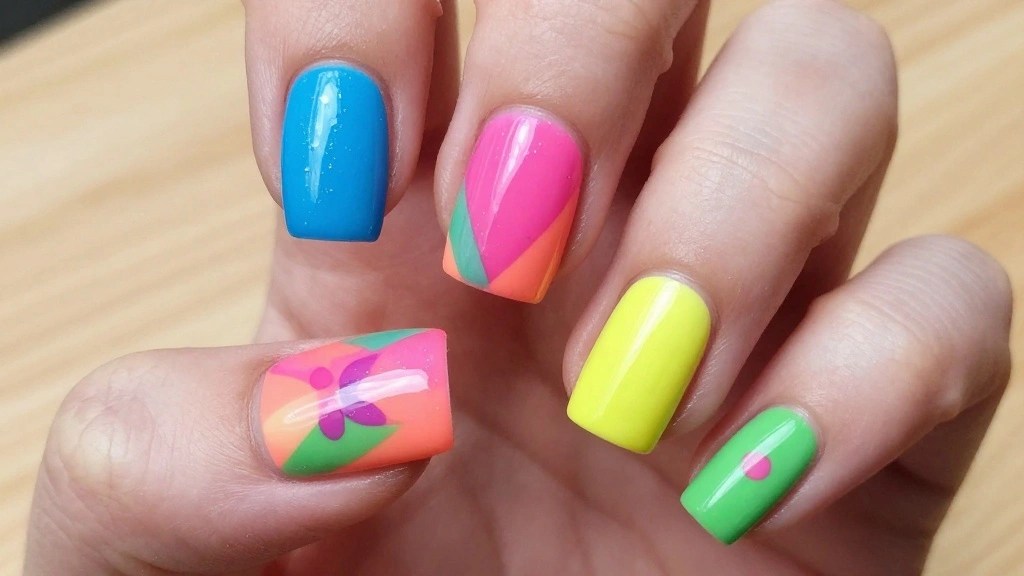
1. Rainbow Swirl Delight

If you’re craving a burst of color on your nails, the Rainbow Swirl Delight design is the way to go! This fun look features a harmonious swirl of vibrant hues that blend seamlessly, making your hands a visual treat. It’s a fantastic option for anyone wanting to showcase their personality with a cheerful yet stylish flair. The glossy finish amplifies the color play, ensuring your nails shine bright.
To create this design, begin with a protective base coat. Use a dotting tool to place colorful dots in a swirling motion across each nail. A fine brush will help you blend the shades into a beautiful gradient. Complete the look with a glossy topcoat for that eye-catching shine!
Key components for this design:
– Base coat for nail protection
– Top coat for a glossy finish
– Nail polish in red, orange, yellow, green, blue, and purple
– Dotting tool for precise application
– Fine brush for blending colors
Get started with these simple steps:
1. Apply a base coat and let it dry.
2. Create colorful dots following a swirling pattern.
3. Blend the colors using a fine brush.
4. Seal it with a glossy topcoat.
5. Allow it to dry, and enjoy your stunning nail art!
2. Neon Floral Burst
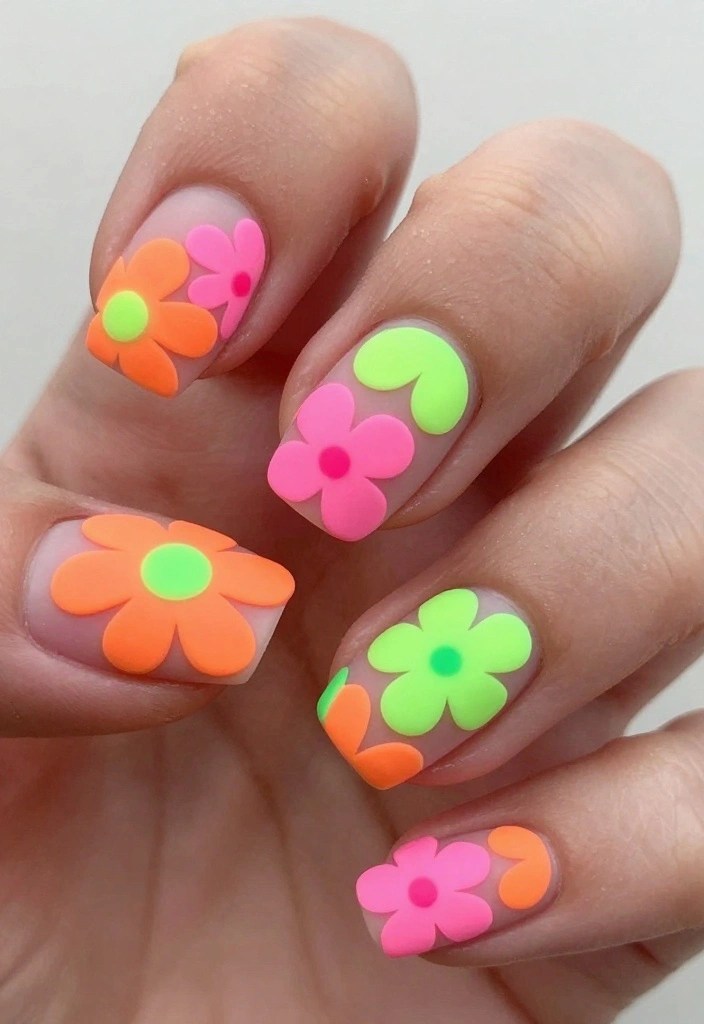
Ready to make a statement? The Neon Floral Burst design combines vibrant floral patterns with eye-popping neon colors, creating a look that truly stands out! This playful design works perfectly for summer events and festivals, adding a splash of brightness to any outfit. The contrast of the matte background with bold florals adds a unique twist to a classic style.
To achieve this look, start with a matte base coat in a neutral shade. Use a fine brush to paint oversized flowers in neon pink, orange, or yellow. Fill in the petals with different shades for depth, and seal your design with a matte topcoat to keep that chic vibe.
Here’s what you’ll need:
– Matte base coat for a smooth finish
– Matte topcoat to seal and protect
– Neon nail polish in pink, orange, and green
– Fine brushes for detailed painting
Follow these steps for a vibrant outcome:
1. Apply a matte base coat and allow it to dry completely.
2. Paint large flowers in neon shades on each nail.
3. Use contrasting colors to fill in the petals.
4. Finish off with a matte topcoat.
5. Let it dry, and flaunt your stunning floral nails!
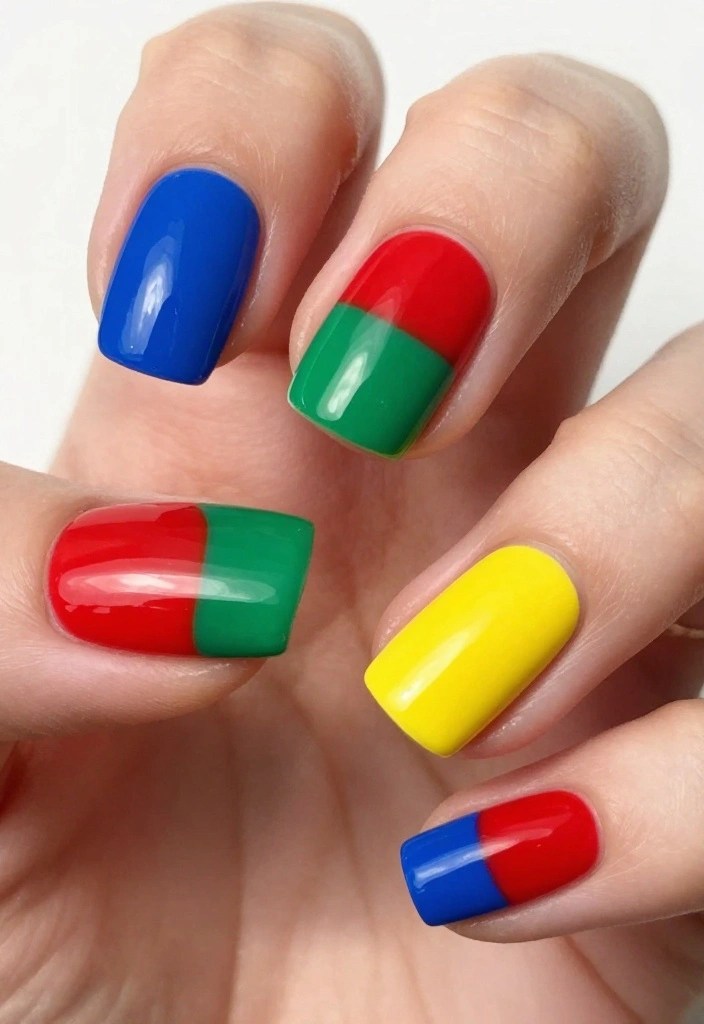
3. Geometric Funk
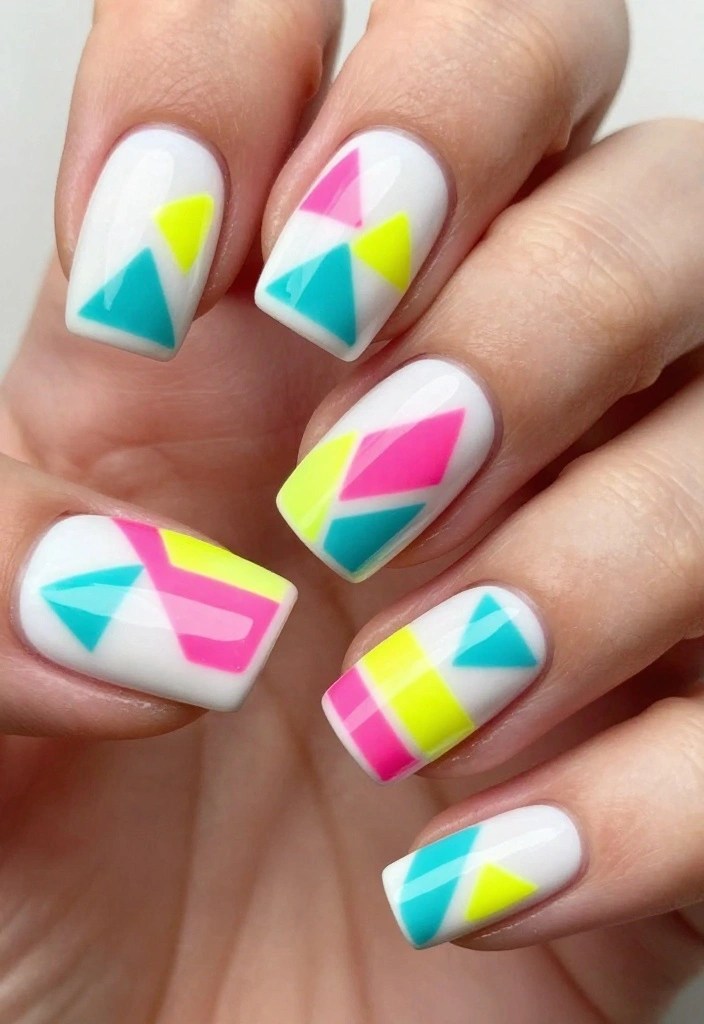
If you’re looking for a trendy nail design, the Geometric Funk is perfect for you! This eye-catching style combines bright colors with sharp geometric shapes, making a bold statement. Ideal for anyone who loves modern aesthetics, this design allows you to express your unique style while keeping it chic.
Start with a clean white base to let the colors pop. Use nail striping tape to create various geometric patterns and paint over them with vibrant shades like hot pink, turquoise, and neon yellow. Once the polish dries, carefully remove the tape for crisp lines, and finish with a topcoat for a professional touch.
Essentials for this design include:
– White nail polish for a clean base
– Bright nail polishes in pink, turquoise, and yellow
– Nail striping tape for precision
– Topcoat for a glossy finish
Get started with these steps:
1. Paint your nails with a white base coat.
2. Apply nail striping tape in geometric shapes.
3. Fill in the exposed areas with bright colors.
4. Remove the tape once the polish dries.
5. Seal with a topcoat for a polished look.
4. Tropical Vibes
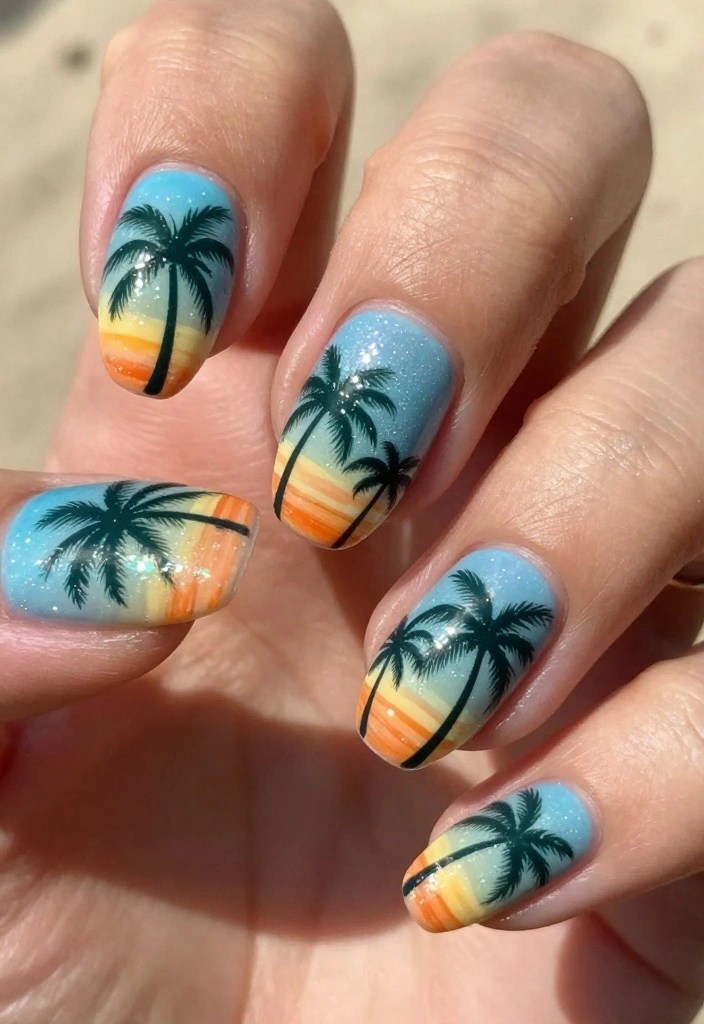
Escape to paradise with the Tropical Vibes nail design! Featuring palm trees, sunsets, and ocean waves, this cheerful style captures the spirit of summer. It’s perfect for vacations or whenever you want to bring a touch of sunny warmth to your look. The bright colors and fun motifs will surely be a conversation starter!
Begin with a soothing soft blue base to represent the ocean. Paint dark green palm trees along the side of your nails using a fine brush. Add vibrant orange and yellow touches for sunsets, and finish with glitter for a sandy beach effect. A matte topcoat enhances the tropical feel.
Gather these materials:
– Soft blue nail polish for the base
– Dark green polish for palm trees
– Bright orange and yellow for sunsets
– Fine brushes for details
– Glitter nail polish for sparkle
– Matte topcoat for a chic finish
Follow these steps to achieve the look:
1. Paint your nails with a soft blue base coat.
2. Once dry, use dark green polish for palm trees.
3. Add orange and yellow accents for a sunset vibe.
4. Apply glitter for a sandy beach effect.
5. Finish with a matte topcoat to complete your tropical design.
📹 Related Video: WATER EFFECT POLYGEL NAILS💙 EASY WATER EFFECT NAIL ART & SUMMER NAIL DESIGN! | Nail Tutorial
How To Choose Bright Nail Designs
Choosing the right bright nail designs can elevate your style and make your hands stand out. With so many options available, it can be tough to narrow it down. Here are some key factors to consider when selecting the perfect colorful nail art for you.
1. Consider Your Skin Tone
Your skin tone plays a crucial role in how a nail color looks against your hands. If you have warm undertones, shades like coral, peach, and warm reds will complement beautifully. For cooler skin tones, opt for blues, purples, and pinks. Test a few colors on your nails to see which ones make your skin glow and enhance your overall appearance.
2. Determine the Occasion
Think about where you will be sporting your nail art. Are you attending a casual get-together, or do you need something more formal? Bright nail designs like neon floral bursts are fun for parties, while ombre elegance or watercolor whimsy may be better suited for a wedding or professional event. Choose designs that fit the vibe of your occasion.
3. Match Your Personal Style
Your nail art should reflect who you are. If you lean towards a chic and minimalist style, opt for subtle designs like bright marble effects or shimmering lace. If you love bold statements, go for something like glitter galaxy or funky animal prints. Consider what makes you feel confident and choose designs that resonate with your personal flair.
4. Think About Maintenance
Some nail designs require more upkeep than others. For instance, intricate designs with lots of details may need touch-ups sooner than simple color block styles. If you’re often busy, consider designs that are easier to maintain. Bright zebra stripes or fun polka dots might be ideal for someone wanting low-maintenance yet eye-catching nails.
5. Experiment with Trends
Nail art trends come and go, so it’s fun to experiment! Check out current styles like color block brilliance or dazzling gradient rhinestones. You can mix and match trends to create a unique look. Don’t hesitate to try something like whimsical butterflies or bright confetti to keep your nail designs fresh and exciting.
6. Budget and DIY vs. Salon
Lastly, consider your budget. Professional nail art can be pricey, especially for complex designs. If you’re crafty, you might want to try some bright nail designs at home. Many vibrant nail polishes and tools are available for DIY projects. Determine if you want a salon experience or if you’re excited about creating your own colorful designs.
Pro Tip: Always keep nail care in mind. Healthy nails make any design look better! Use a base coat to protect your nails, and don’t forget to moisturize your cuticles. This not only enhances the look of your bright nail designs but also promotes nail health.
Armed with these tips, you’re ready to choose the perfect bright nail designs that will make your hands the center of attention! Enjoy expressing your creativity!
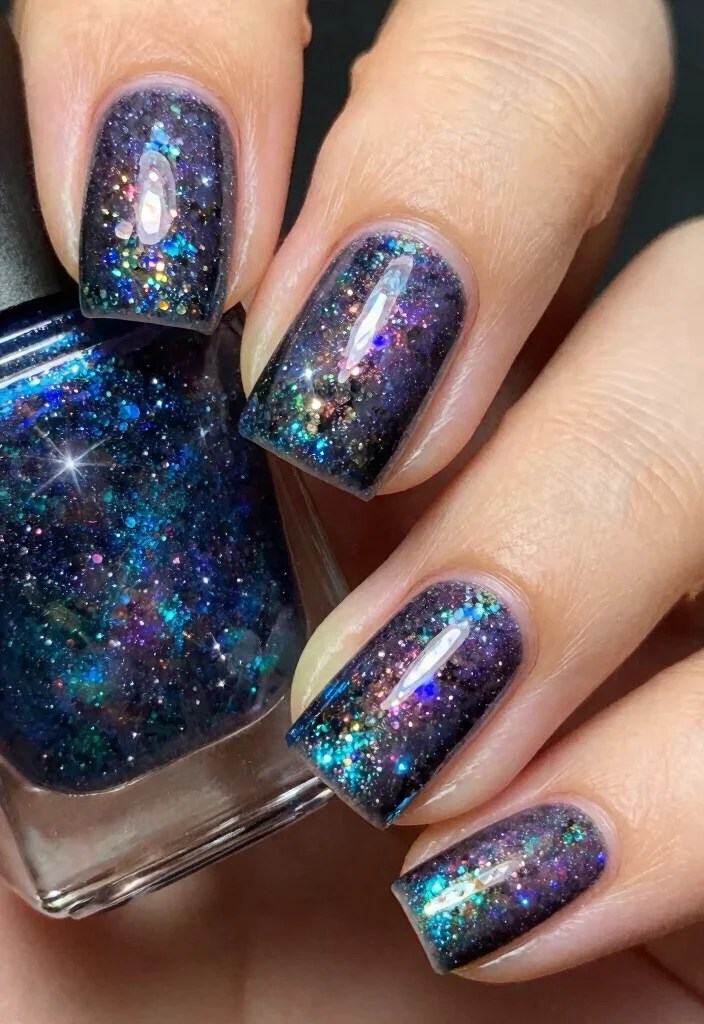
5. Cosmic Galaxy

Bring the magic of the universe to your nails with the Cosmic Galaxy design! This captivating look features deep blues, purples, and sparkling stars, perfect for those who love a touch of mystery and glam. It’s an ideal choice for adding a bit of whimsy to any outfit, making your nails a true celestial wonder!
To create this stunning effect, start with a dark blue or purple base. Use a sponge to dab on lighter shades of blue, pink, and white, blending them to form a swirling galaxy. Add tiny dots of white or silver for stars, and finish with a glossy topcoat to enhance the shine.
Materials you’ll need:
– Dark blue or purple nail polish as the base
– Lighter shades of blue, pink, and white for the galaxy
– Small dotting tool or toothpick for stars
– Topcoat for a glossy finish
Here’s how to do it:
1. Paint your nails with a dark base coat.
2. Use a sponge to dab on lighter colors for the galaxy effect.
3. Add tiny dots of white or silver for stars.
4. Seal with a glossy topcoat for an extra shine.
5. Let your cosmic nails dry and enjoy the magic!
6. Candy Coated Dreams
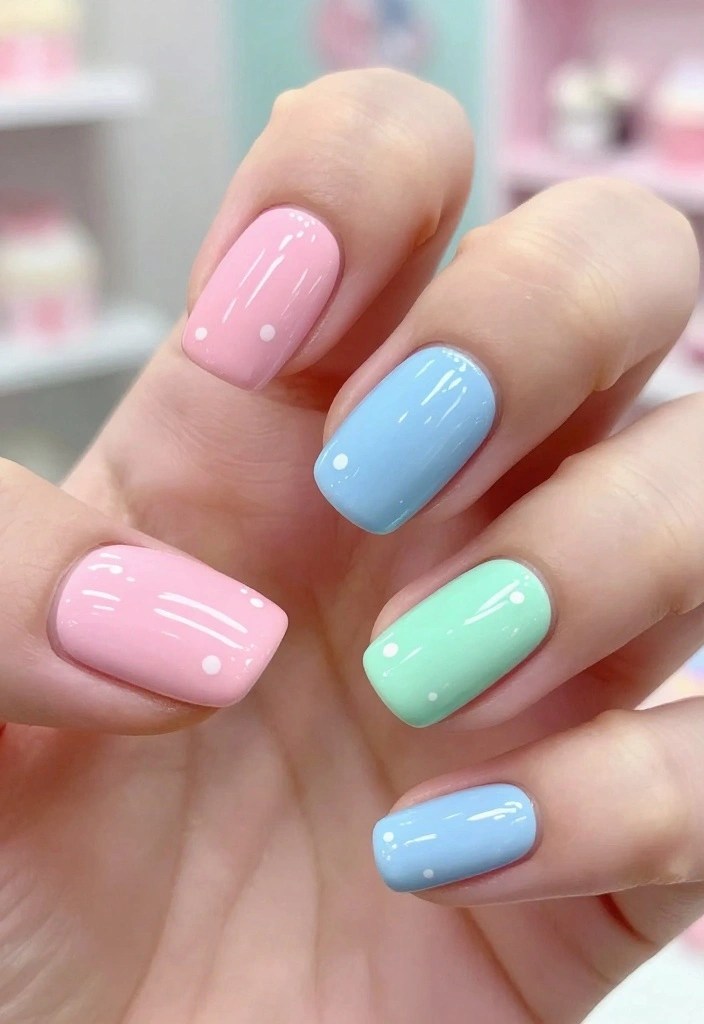
Dive into sweetness with Candy Coated Dreams! This delightful design features pastel shades that evoke the joy of your favorite candies, like cotton candy and ice cream. It’s playful and perfect for anyone looking to add a sweet touch to their style. The soft colors are especially lovely for spring or summer!
To recreate this whimsical look, choose a selection of pastel nail polishes. Apply each color to separate nails or blend them for a rainbow effect. You can even add small dots or lines for added fun, finishing with a glossy topcoat to lock in the sweetness.
Here’s what you’ll need:
– A range of pastel nail polishes (light pink, baby blue, lavender, mint green)
– Dotting tool for added design (optional)
– Topcoat for a shiny finish
Start with these simple steps:
1. Paint your nails with a base coat of your selected pastels.
2. Alternate colors for each nail or blend for multi-colored designs.
3. Use a dotting tool to create playful patterns if desired.
4. Finish with a glossy topcoat.
5. Enjoy your candy-coated dreams!
Candy Coated Dreams
Editor’s Choice


7. Ombre Elegance
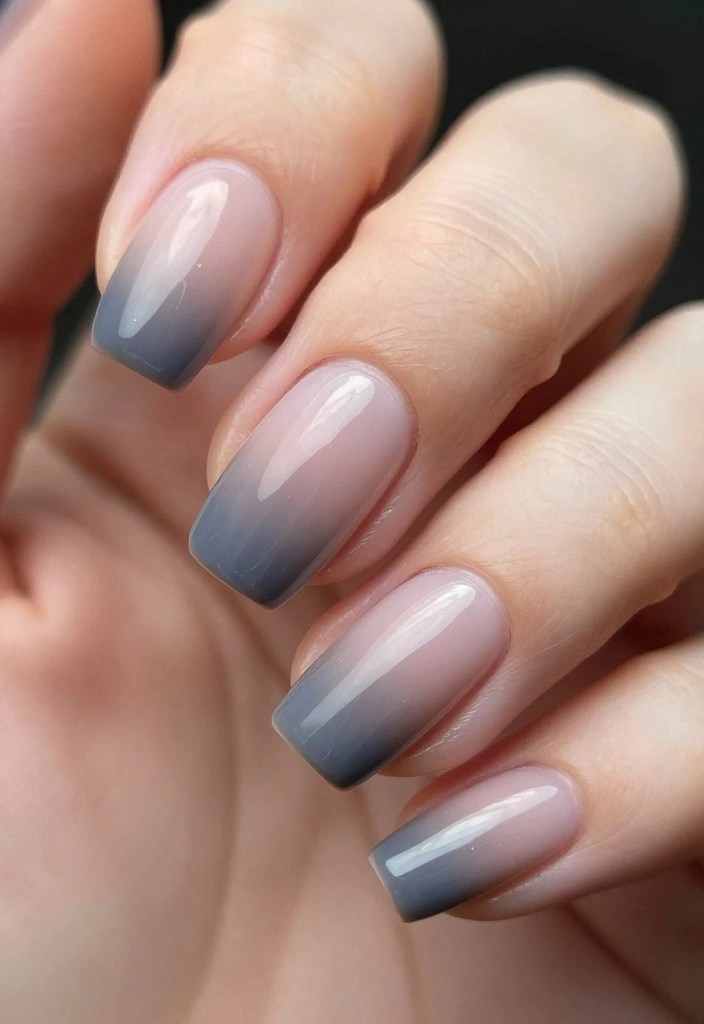
Ombre nails are a timeless classic that adds a touch of sophistication to any look. This design features a smooth gradient transition from one color to another, creating an eye-catching effect that suits any occasion. It’s a perfect way to showcase elegance with a modern twist.
To achieve the ombre effect, select two or more complementary colors. Apply a lighter shade as the base, then use a sponge to dab on the darker shade, blending them seamlessly. You can choose a vertical or horizontal gradient based on your style preference. Finish with a glossy topcoat to enhance the overall effect.
Materials you’ll need:
– Two or more nail polishes in complementary colors
– Beauty sponge for blending
– Topcoat for a polished finish
Here’s how to create your ombre nails:
1. Paint your base coat with the lighter shade.
2. Use the sponge to dab on the darker shade, blending it into the light color.
3. Continue blending until you achieve the desired gradient.
4. Seal with a glossy topcoat for a sleek finish.
5. Let your ombre elegance shine!
8. Watercolor Whimsy
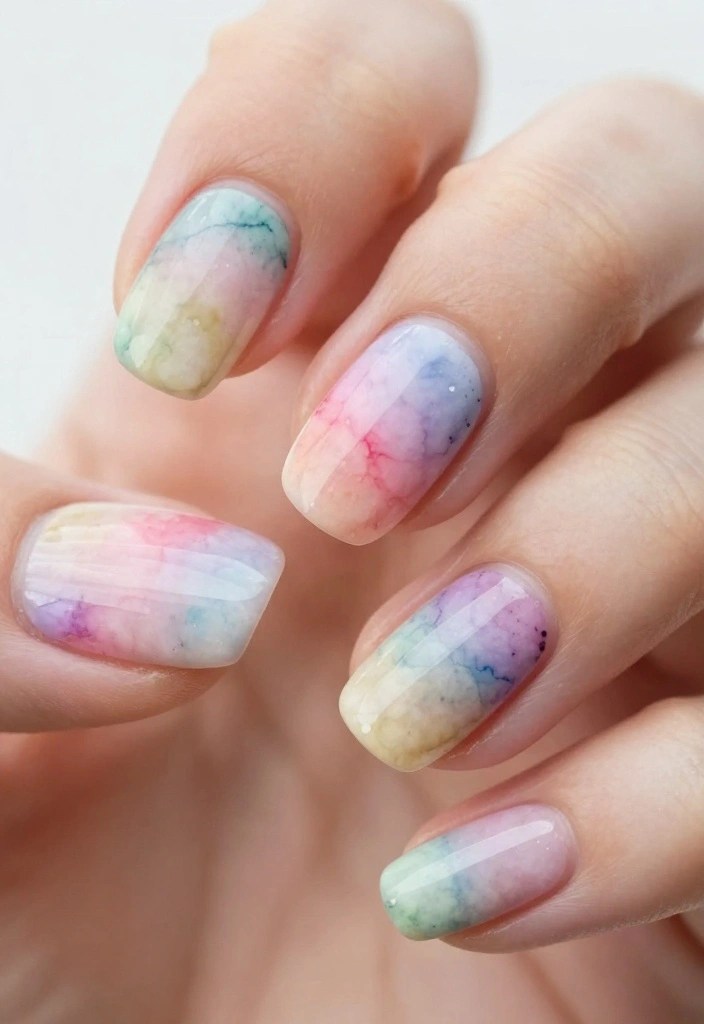
Transform your nails into pieces of art with the Watercolor Whimsy design! This dreamy style mimics the ethereal effects of watercolor paintings, giving your nails a soft and artistic flair. Perfect for those who love unique styles, this design is both playful and elegant at the same time.
Begin with a clear base coat, then use a small brush to apply splotches of various soft colors, blending them gently. The key is to keep the shades light and airy, allowing them to flow into one another. Finish with a matte topcoat to achieve that painterly finish.
Essential materials include:
– Clear base coat for protection
– Soft pastel nail polishes (light pink, blue, lavender)
– Small brushes for blending
– Matte topcoat for a unique finish
Follow these steps to create your watercolor nails:
1. Apply a clear base coat and let it dry.
2. Using a small brush, dab on splashes of different colors.
3. Blend the colors lightly for a watercolor effect.
4. Finish with a matte topcoat to set your design.
5. Allow your whimsical watercolor nails to dry completely!
Watercolor Whimsy nails feel like tiny art you wear. When you dab soft colors and blend them lightly, your hands glow with bright nail designs that still look effortless. It’s playful yet elegant—perfect for everyday art you can wear.
Watercolor Whimsy
Editor’s Choice


You might also like
10 Best Valentine’s Day Nail Art Kits of 2025 – Create Stunning Designs at Home
9. Color Block Brilliance
Color blocking is a trendy way to express your style with bold hues on your nails. This vibrant design features sections of bright colors arranged in creative patterns, making for a modern and chic look. It’s an excellent way to show off your personality while keeping it fashionable!
To achieve this eye-catching design, start with a base coat and use tape to section off parts of your nails. Paint each section with a different color, allowing the bright hues to come together in a harmonious display. Remove the tape once dry, and finish off with a glossy topcoat for a polished appearance.
Here are the essentials for this design:
– Base coat for protection
– Variety of bright nail polishes (red, blue, green, yellow)
– Tape for clean lines
– Topcoat for a shiny finish
Get started with these steps:
1. Paint your nails with a base coat and allow to dry.
2. Use tape to create sections on your nails.
3. Fill in each section with a different color.
4. Carefully remove the tape after the polish has dried.
5. Finish with a topcoat to enhance the colors.
Color Block Brilliance
Editor’s Choice


10. Glitter Galaxy
If you adore sparkle, the Glitter Galaxy design is your perfect match! Combining vivid colors with dazzling glitter, this fun and flashy look is sure to catch attention. It’s ideal for parties or any time you want to stand out in a crowd!
Begin with a dark base coat, then apply glitter polish either in sections or all over for a starry effect. You can create a galaxy vibe by using various colored glitter that complements your bright palette. Seal your design with a topcoat to keep everything in place.
Here’s what you’ll need:
– Dark nail polish (black, navy)
– Bright glitter nail polish for a sparkling finish
– Topcoat for durability
Here’s how to create your glitter galaxy:
1. Paint your nails with a dark base coat and allow it to dry.
2. Apply glitter polish, focusing on the tips or covering the entire nail.
3. Seal your design with a topcoat to keep the glitter intact.
4. Let dry completely for a dazzling finish.
Fun fact: Glitter Galaxy nails boost perceived color brightness by up to 20% when paired with a dark base. For bright nail designs that pop, layer glitter in sections and seal with a topcoat for a long-lasting starry finish. Pro tip: dab polish while wet for seamless sparkle.
Glitter Galaxy
Editor’s Choice


11. Metallic Glow

Shine bright with the Metallic Glow nail design! This look features radiant metallic shades that reflect light beautifully, adding a modern edge to your nails. Perfect for those who want to make a statement, this design is all about style and flair.
Start with a base coat and apply a metallic polish in your favorite color. Options like gold, silver, or even metallic blue can elevate your look. Finish with a glossy topcoat to enhance the shine and extend the life of your metallic nails.
Gather these materials:
– Base coat for protection
– Metallic nail polish (gold, silver, blue)
– Topcoat for a glossy finish
Here’s how to achieve the perfect metallic nails:
1. Apply a base coat to shield your nails.
2. Paint your nails with metallic polish and let it dry.
3. Seal with a glossy topcoat for maximum shine.
4. Enjoy your eye-catching metallic nails!
12. Bright Zebra Stripes
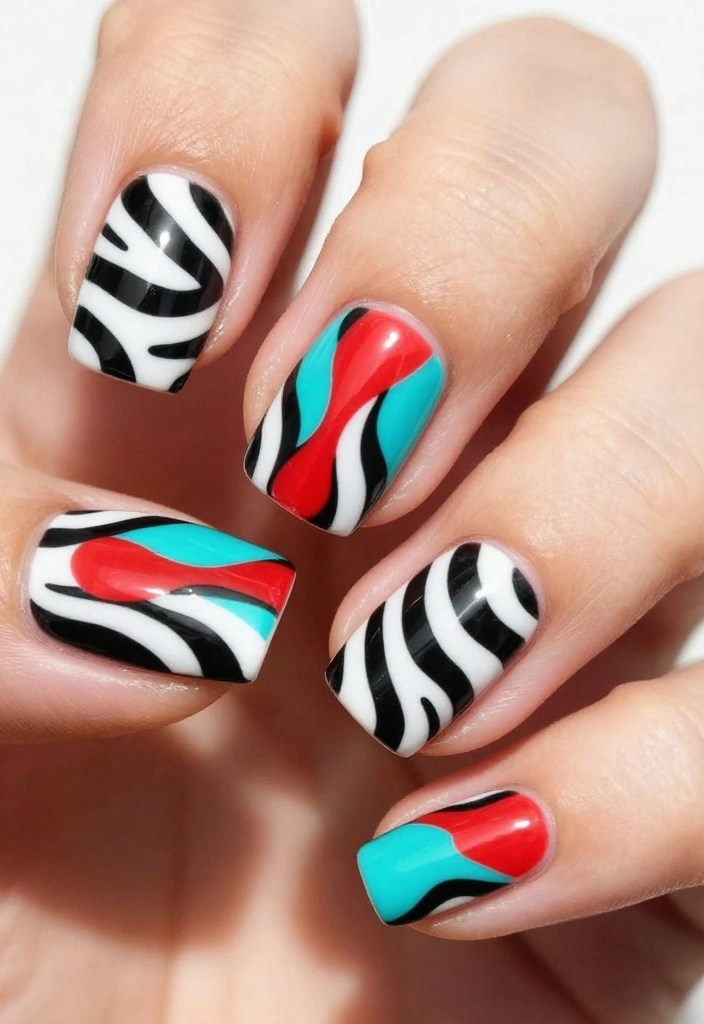
Zebra stripes add a playful twist to a classic print! This design features bold black and white stripes enhanced with vibrant colors, creating a fun look that exudes confidence. It’s perfect for anyone wanting to express their wild side without going overboard!
Begin with a white base coat, then use a fine brush or nail art pen to create the black stripes. Once dry, fill in some stripes with bright colors like fuchsia or electric blue. Finish your look with a topcoat for a polished design that’s sure to turn heads.
Here’s what you’ll need:
– White nail polish for the base
– Black nail polish for stripes
– Bright nail polishes (fuchsia, blue)
– Fine brush or nail art pen for precision
– Topcoat for a lasting finish
Get started with these steps:
1. Paint your nails with a white base coat and let dry.
2. Create zebra stripes with black polish using a fine brush.
3. Fill in some stripes with bright colors once dry.
4. Apply a topcoat to seal your design.
5. Flaunt your fun zebra stripes!
13. Dazzling Gradient Rhinestones

Elevate your nail game with the Dazzling Gradient Rhinestones design! This glamorous look features a gradient of colors adorned with rhinestones at the base, creating a stunning effect. It’s perfect for special occasions or whenever you want to treat yourself to something fabulous!
Select a color palette and create a beautiful gradient on your nails. After the polish dries, carefully place rhinestones at the base of each nail for that extra sparkle. Finish with a topcoat to secure everything in place.
Here’s what you’ll need:
– Base coat for protection
– Nail polishes in various colors for the gradient
– Rhinestones (small and large for variation)
– Topcoat to seal your design
Follow these steps to achieve your dazzling nails:
1. Apply a base coat and let it dry.
2. Create a gradient effect with your chosen colors.
3. Once dry, place rhinestones at the base of each nail.
4. Seal with a topcoat to keep rhinestones secure.
5. Show off your dazzling nails!
Dazzling Gradient Rhinestones
Editor’s Choice


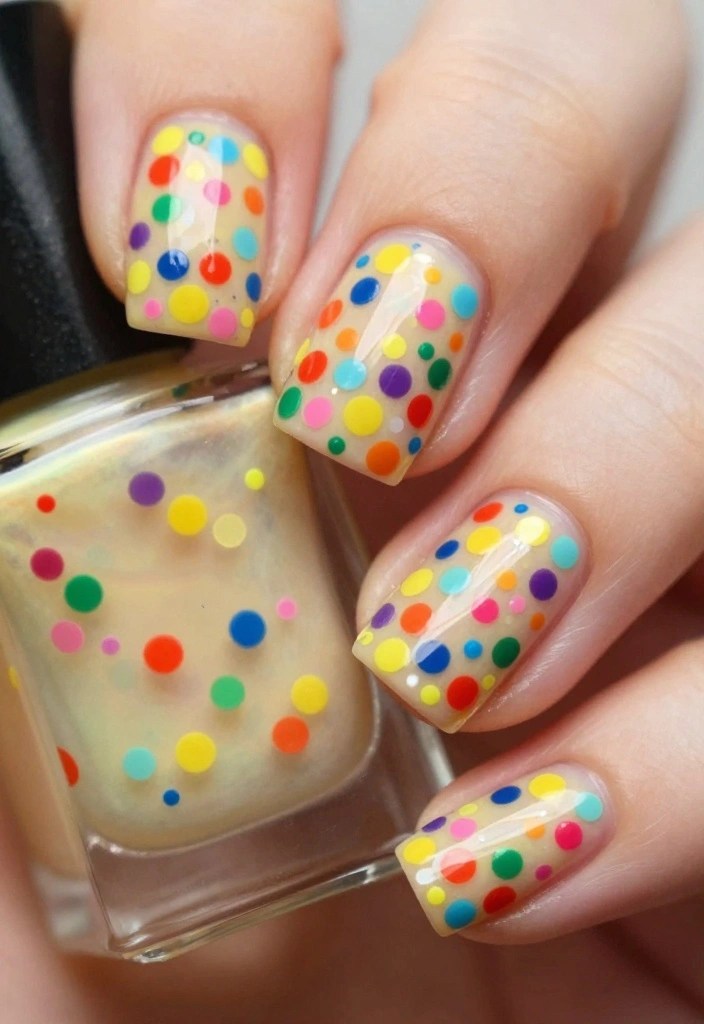
14. Fun Polka Dots

Polka dots are a timeless design that adds a cheerful vibe to your nails! This playful style features bright base colors with contrasting polka dots, creating a fun and lively look. It’s great for both casual outings and dressier occasions!
Select a bright base color, and once dry, use a dotting tool to apply contrasting dots. You can alternate colors or create unique patterns for added flair. Seal your design with a glossy topcoat to finish the look!
Materials needed:
– Bright nail polish for the base
– Contrasting nail polish for the dots
– Dotting tool for precision
– Topcoat for durability
Here’s how to create your fun polka-dot nails:
1. Paint your nails with a bright base coat and let dry.
2. Use a dotting tool to apply contrasting color dots.
3. Vary dot sizes for extra fun!
4. Finish with a topcoat to keep your design lasting.
5. Enjoy your fun polka-dot nails!
Fun fact: bright nail designs with polka dots can lift your mood in seconds—just a bold base with contrasting dots. Pro tip: use a dotting tool for perfect circles, then seal with a glossy topcoat to keep them crisp all week.
15. Shimmering Lace
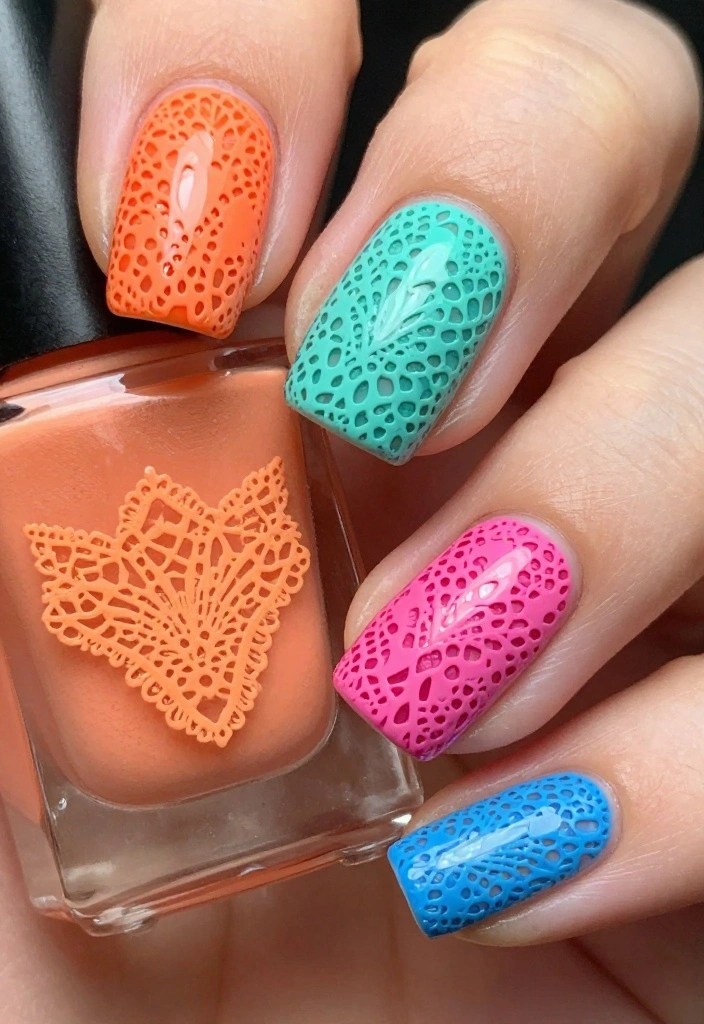
Lace designs bring a touch of elegance to your nails. The Shimmering Lace design features intricate lace patterns in bright colors, combining femininity with fun. It’s ideal for weddings or special events when you want to feel chic and playful!
Start with a bright base color and use a fine brush to create delicate lace designs. White or silver polish beautifully contrasts against bold colors. Once you finish your design, seal it with a topcoat to keep everything perfectly intact.
Gather these materials:
– Bright base color for the foundation
– White or silver polish for the lace
– Fine brush for detailing
– Topcoat for a glossy finish
Follow these steps to achieve your elegant lace nails:
1. Paint your nails with a bright base color and let dry.
2. Use a fine brush to create lace designs with white or silver polish.
3. Allow to dry before applying a topcoat.
4. Flaunt your elegant lace nails!
16. Colorful Stars
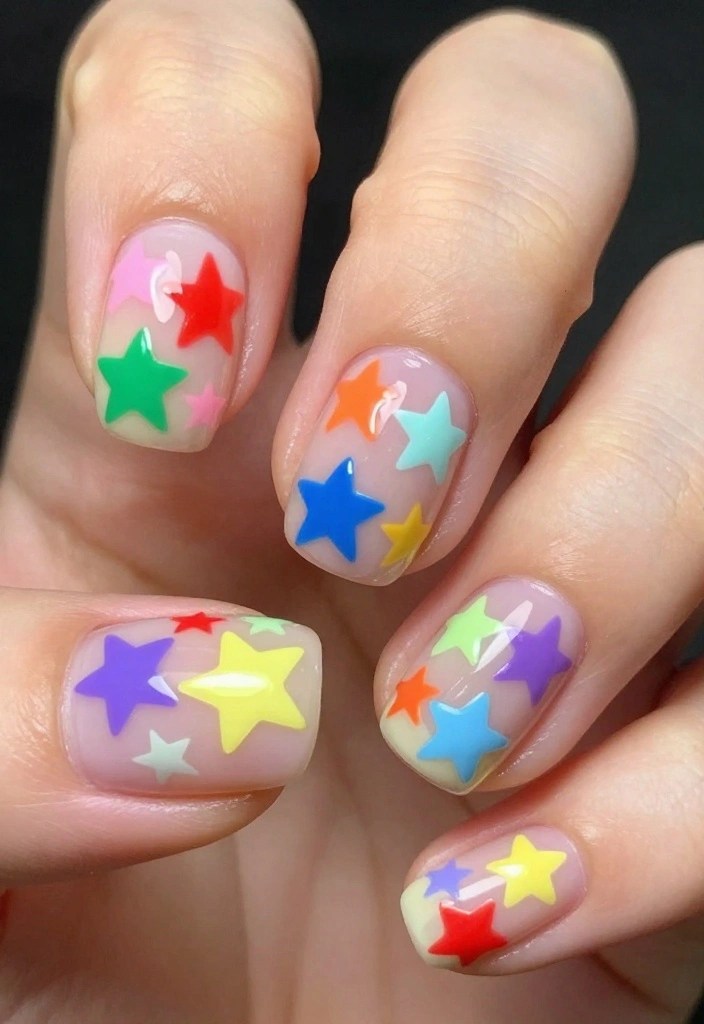
Stars brighten up any nail design! The Colorful Stars design features vibrant shades enhanced by star shapes, creating a lively and whimsical look. It’s suitable for all ages and adds a playful touch to any style!
Start with a bright base color and use star-shaped stickers or a fine brush to create star designs on your nails. You can mix and match colors or stick to a cohesive palette for a unified appearance. Finish with a glossy topcoat to bring out the fun of the stars.
Essentials for this design:
– Bright base color for the foundation
– Star-shaped stickers or fine brush for drawing
– Various bright nail polishes for the stars
– Topcoat for a shiny finish
Here’s how to bring your colorful stars to life:
1. Paint your nails with a bright base coat and let dry.
2. Apply star stickers or draw stars with a fine brush.
3. Use colorful polish for the stars for added fun.
4. Seal with a glossy topcoat to enhance the stars.
5. Show off your colorful star nails!
17. Bright Marble Effect

Marble nails are a sophisticated trend that looks chic and unique. The Bright Marble Effect incorporates vivid colors into a stunning marble design, perfect for making a bold statement! It’s ideal for anyone who wants to add a touch of elegance with a twist.
Begin with a white base, and while it’s wet, drop in bright nail polishes. Use a thin brush or toothpick to swirl the colors, creating a marbled appearance. Finish with a topcoat to seal your beautiful artwork!
Materials you’ll need:
– White nail polish for the base
– Bright nail polishes (pink, blue, green)
– Thin brush or toothpick for swirling
– Topcoat for a lasting finish
Follow these steps to create your marble nails:
1. Apply a white base coat and let it dry slightly.
2. Drop bright colors onto the wet base.
3. Swirl with a brush or toothpick to create a marble effect.
4. Finish with a topcoat to set your design.
5. Enjoy your stunning marble nails!
18. Funky Animal Prints

Animal prints are always a crowd favorite! The Funky Animal Prints design features vibrant colors against bold patterns like leopard or zebra, creating a fun and adventurous look. It’s perfect for anyone who enjoys expressing their wild side!
Start with a bright base color, then use a fine brush to create animal prints in contrasting shades. You can alternate colors for different nails or stick to a cohesive theme. Finish with a topcoat to keep everything looking fresh and fabulous!
Gather these materials:
– Bright nail polish for the base
– Contrasting colors for animal prints
– Fine brush or stencils for easy application
– Topcoat for durability
Here’s how to rock your funky animal print nails:
1. Apply a bright base color and allow to dry.
2. Use a fine brush to draw animal prints with contrasting colors.
3. Finish with a topcoat to seal your design.
4. Show off your funky animal print nails!
19. Whimsical Butterflies
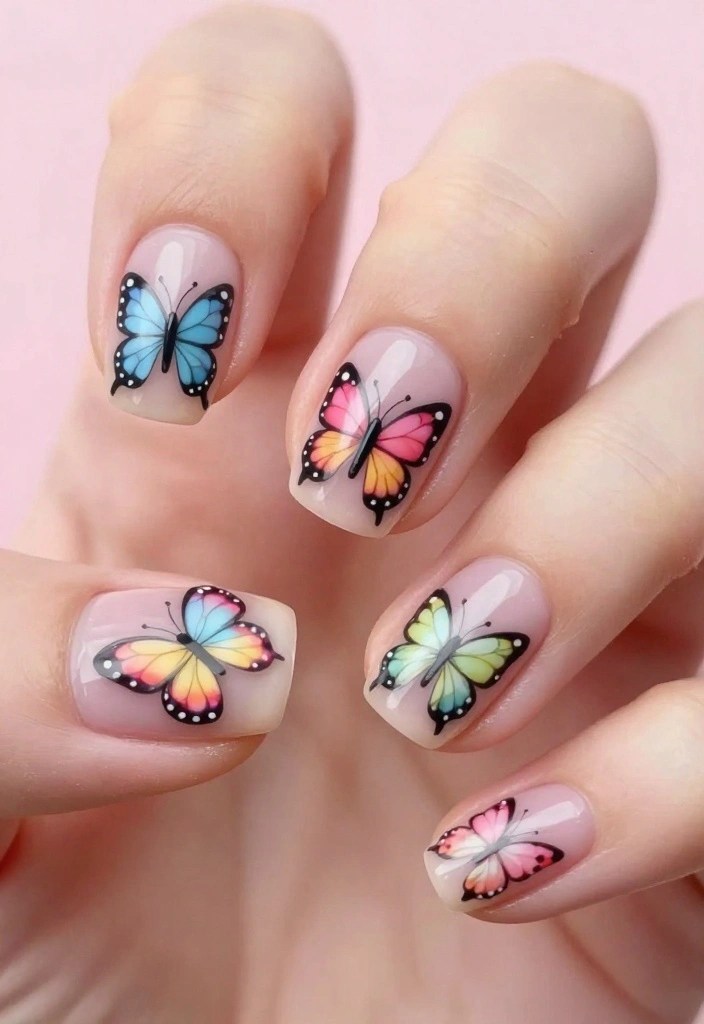
Add a touch of whimsy to your nails with the Whimsical Butterflies design! This bright and colorful style features butterflies dancing across your nails, creating a playful and enchanting look. It’s perfect for spring or summer and brings a bit of nature to your fingertips!
Begin with a soft pastel base and use a fine brush to paint butterflies in bold shades. You can create different styles for each nail or maintain a cohesive theme. Finish with a glossy topcoat to let the butterflies shine!
Materials you’ll need:
– Soft pastel nail polish for the base
– Bright nail polishes (pink, blue, yellow)
– Fine brush for detailing
– Topcoat for a glossy finish
Here’s how to create your whimsical butterfly nails:
1. Apply a base coat of soft pastel color and let dry.
2. Use a fine brush to paint butterflies in bright colors.
3. Allow to dry before applying a topcoat.
4. Enjoy your whimsical butterfly nails!
20. Bright Confetti
Celebrate in style with Bright Confetti nails! This vibrant design incorporates colorful dots against a bright base color, emulating a fun party vibe perfect for any celebration. It’s playful, festive, and suitable for all occasions!
Start with a bright base color and use a dotting tool to randomly apply colorful dots for that confetti effect. You can choose a more organized pattern or a free-spirited look. Finish with a topcoat to lock everything in for a long-lasting finish!
Essentials for this design:
– Bright base color (any color you like)
– Various bright nail polishes for dots
– Dotting tool for precision
– Topcoat for durability
Follow these steps to achieve your festive confetti nails:
1. Paint your nails with a bright base coat and let dry.
2. Use a dotting tool to create dots of different colors on each nail.
3. Apply them randomly for a fun confetti effect.
4. Seal with a topcoat to enhance your design.
5. Enjoy your festive confetti nails!
Conclusion

Your nails are a canvas for creativity, and these bright nail designs are perfect for letting your personality shine through! From playful florals to elegant ombres and funky animal prints, there’s a design here for everyone. Experiment with colors and techniques, and don’t be afraid to add your unique flair to each look. Now, it’s time to unleash your creativity and make your hands the center of attention!
Note: We aim to provide accurate product links, but some may occasionally expire or become unavailable. If this happens, please search directly on Amazon for the product or a suitable alternative.
This post contains Amazon affiliate links, meaning we may earn a small commission if you purchase through our links, at no extra cost to you.
Frequently Asked Questions
What makes bright nail designs from this article so eye-catching, and which styles should you try first?
Bright nail designs pop because they use bold color combos, high contrast details, and playful patterns that reflect personality. In the article, styles range from neon stripes to confetti tips and gradient sunsets—perfect for turning any manicure into a centerpiece. To try first, start with a two-color combo on all nails or a single accent nail in a vibrant hue. For best results, pair with a clear or pale base and finish with a glossy top coat to lock in the shine.
Use bright nail designs to experiment, and don’t be afraid to mix textures like glossy with matte for extra eye-catching detail.
How can I recreate design #8 from the gallery at home without professional tools?
Recreate design #8 with simple items: two bright polishes, a thin nail-art brush or striping tape, and a steady hand. Start with a solid base, let it dry, then add thin color lines or dots in a contrasting hue. Seal with a top coat and let it cure fully. If you don’t have tools, you can use a toothpick or bobby pin for tiny details. This approach delivers a vibrant look that still feels polished and eye-catching.
What tools and products do I need for colorful nail art at home?
Gather a solid base coat, a durable top coat, and several bright polishes in your favorite bright nail designs palette. Add a striping brush or nail-art brushes, a dotting tool or toothpicks for tiny details, nail tape for clean lines, and remover for quick fixes. Finish with a quick-dry top coat to boost longevity. With these tools, you can create vibrant, eye-catching nails at home in minutes.
How can I make bold nail designs last longer and resist chipping?
Prep nails with a gentle buff and cuticle care, wipe away oils, and apply 2–3 thin coats of color rather than one thick coat. Finish with a durable top coat and reapply it every 2–3 days. Keep nails out of hot water for the first 24 hours, and use cuticle oil to prevent lifting at the edges. These steps help your bright nail designs stay fresh and eye-catching longer.
Are bright nail designs appropriate for work or formal events, and how should I style them for different occasions?
Absolutely—bright nail designs can be workplace-friendly and perfect for events when styled with balance. Try a single neon accent nail or pair two neutrals with one vibrant shade to keep things professional while still fun. For formal occasions, use a subtle shimmer or a monochrome palette with one bold pop. This approach keeps your nails eye-catching without overpowering your outfit.
Related Topics
bright nail designs
colorful nail art
vibrant styles
eye-catching designs
nail art techniques
trendy manicures
beginner friendly
advanced nail art
seasonal colors
party nails
quick nail designs
creative nail ideas

Leave a comment